


Non-woven handmade diy little fox doll making tutorial
- 作者:
- 来源:
- 日期 : 2020-08-26
How to make a cute children's day gift non-woven little fox doll.
Crane grasping machines have not been very popular in the past few years, but in recent years, there has been a trend of grasping dolls. There will be a row of crane grasping machines in major shopping malls, and the front is also full of people. Practicing your skills, you have to be able to rank, then it’s better to make dolls at home. On Children’s Day, use this cute little fox doll made by yourself as a Children’s Day gift for your children. You still need to be patient when making it. After all, it's a big project.
Main material:
non-woven fabric, filled cotton,
Tools needed:
scissors, needlework, chalk,
production steps:
Step 1: Prepare white, black and orange non-woven fabrics
Step 2: First, cut out all parts of the body of this non-woven little fox doll. You can cut it out with white paper first, and then cut the non-woven fabric according to the comparison.
Step 3: Fix it slightly with glue
Step 4: Then you can start sewing with needles and threads
Step 5: Use needle and thread to sew the white non-woven fabric on the face
Step 6: The stitches should be as small as possible when sewing
Step 7: Be careful not to wrinkle the cloth during sewing
Step 8: Then sew the small nose
Step 9: Continue to make
Step 10: Start sewing the ears
Step 11: Use a needle and thread to sew the two side layers together
Step 12: Continue to sew
Step 13: Make the edge stitches neater
Step 14: Keep sewing
Step 15: The ears will be sewn soon
Step 16: Then let's sew the ears to the head and draw the eyes and mouth with a pen
Step 17: Then you can start sewing with black thread
Step 18: When sewing, pay attention to the appropriate arc
Step 19: Sew slowly
Step 20: Sewing an eye
Step 21: The last upturned curve is very beautiful
Step 22: Then let's continue with the other eye
Step 23: Still sew slowly
Step 24: Finally, sew the mouth, the same way to sew
Step 25: Use a cotton swab to apply the little red cheek
Step 26: Use a thick thread to sew, and then you can start to sew the two layers of non-woven fabric together
Step 27: Sew the edges like this
Step 28: Then stuff the stuffing cotton, and you can sew completely
Step 29: Now let’s make the tail
Step 30: Sew up the end of the tail with a black thread
Step 31: Then stitch the two layers
Step 32: Sew the tail and body together
Step 33: Fill the body with cotton padding and sew it.
Step 34: Let’s sew the head and body together
Step 35: Sewing on the body like this
Step 36: Let's thread the needle to the head again
Step 37: Slowly sew the head and body together, taking care not to tilt your head
Step 38: The back view is also very regular
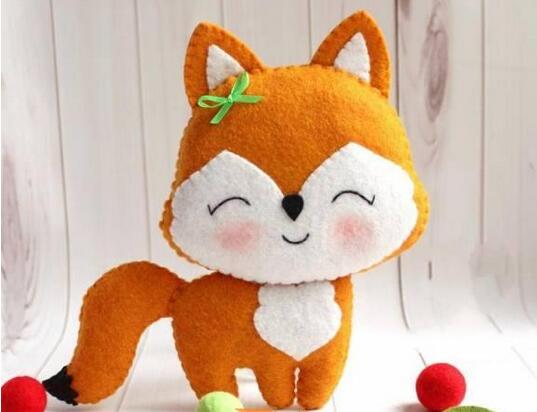
Step 39: This cute non-woven little fox doll is ready
Crane grasping machines have not been very popular in the past few years, but in recent years, there has been a trend of grasping dolls. There will be a row of crane grasping machines in major shopping malls, and the front is also full of people. Practicing your skills, you have to be able to rank, then it’s better to make dolls at home. On Children’s Day, use this cute little fox doll made by yourself as a Children’s Day gift for your children. You still need to be patient when making it. After all, it's a big project.
Main material:
non-woven fabric, filled cotton,
Tools needed:
scissors, needlework, chalk,
production steps:
Step 1: Prepare white, black and orange non-woven fabrics
Step 2: First, cut out all parts of the body of this non-woven little fox doll. You can cut it out with white paper first, and then cut the non-woven fabric according to the comparison.
Step 3: Fix it slightly with glue
Step 4: Then you can start sewing with needles and threads
Step 5: Use needle and thread to sew the white non-woven fabric on the face
Step 6: The stitches should be as small as possible when sewing
Step 7: Be careful not to wrinkle the cloth during sewing
Step 8: Then sew the small nose
Step 9: Continue to make
Step 10: Start sewing the ears
Step 11: Use a needle and thread to sew the two side layers together
Step 12: Continue to sew
Step 13: Make the edge stitches neater
Step 14: Keep sewing
Step 15: The ears will be sewn soon
Step 16: Then let's sew the ears to the head and draw the eyes and mouth with a pen
Step 17: Then you can start sewing with black thread
Step 18: When sewing, pay attention to the appropriate arc
Step 19: Sew slowly
Step 20: Sewing an eye
Step 21: The last upturned curve is very beautiful
Step 22: Then let's continue with the other eye
Step 23: Still sew slowly
Step 24: Finally, sew the mouth, the same way to sew
Step 25: Use a cotton swab to apply the little red cheek
Step 26: Use a thick thread to sew, and then you can start to sew the two layers of non-woven fabric together
Step 27: Sew the edges like this
Step 28: Then stuff the stuffing cotton, and you can sew completely
Step 29: Now let’s make the tail
Step 30: Sew up the end of the tail with a black thread
Step 31: Then stitch the two layers
Step 32: Sew the tail and body together
Step 33: Fill the body with cotton padding and sew it.
Step 34: Let’s sew the head and body together
Step 35: Sewing on the body like this
Step 36: Let's thread the needle to the head again
Step 37: Slowly sew the head and body together, taking care not to tilt your head
Step 38: The back view is also very regular
Step 39: This cute non-woven little fox doll is ready